Generative AI
This page provides guidelines for generative AI software, tools and models that CHPC either provides or supports. As this is a very rapidly changing field, please contact us at helpdesk@chpc.utah.edu with any suggestions for other packages or models that you would like to use.
GPT4All UI
There are many LLM chat applications but many popular ones (LMStudio, Janai) are designed for desktop use and don't recognize the headless GPUs that we have in our servers. GPT4All is using a CUDA LLM backend which allows it to work on our systems.
GPT4All Open OnDemand app
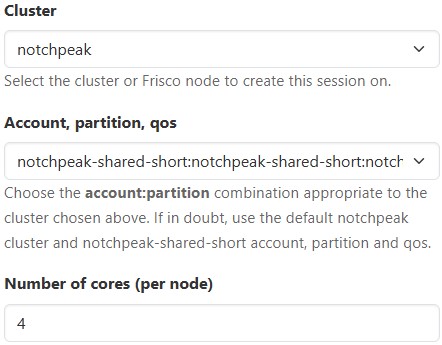
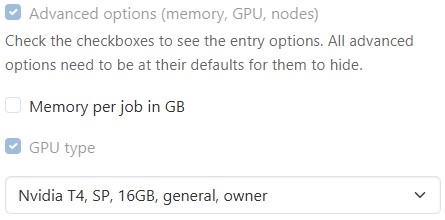
The easiest way to start with GPT4All is to use the Open OnDemand app. This link opens a HPC cluster job form, where we specify on what resources to run the GPT4All. For good performance, we recommend to choose a GPU, however, powerful GPUs tend to be busy and not available right away. For this reason we recommend to start with the notchpeak-shared-short account and partition on the Notchpeak cluster, about 4 CPU cores, and one of the two GPU types available in this partition, which is accessible via the Advanced Options - GPU Type checkbox.
Once the resources are selected, push the blue Launch button to submit the job. The web browser then loads the My Interactive Sessions page with a card of the submitted job. Once the job starts, the job card changes and a blue Launch GPT4All button appears. Push that button and the GPT4All application starts in a new browser tab.
The application has fairly intuitive interface, which allows one to download LLM models, run chats, and upload own documents to embed to downloaded LLM models.
After the program started, verify that it recognizes the GPU by going to Settings - Device and choosing the GPU (e.g. CUDA: Tesla T4).
Also be aware that the program by default downloads the LLM models into your home directory (into ~/.local/share/nomic.ai/GPT4All), which has 50 GB quota. If you plan to use more or larger models, change the model download path in Settings - Download Path to something that has more capacity (e.g. group storage). You can also choose the models that we have pre-downloaded in /scratch/general/vast/app-repo/gguf. This reduces the storage needs by minimizing duplication of models by each user. If there's a model you would like us to download, let us know.
Ollama
Ollama is a command line tool to run large language models.
CHPC installation
CHPC provides Ollama as a module named ollama. To use it, start an interactive job, followed by starting the Ollama server. Ollama
client commands can then be run in another terminal on the same machine to list/pull/run
models. Notice that in this example we are not asking for a GPU, Ollama runs on CPU
only as well, but slower.
salloc -N 1 -n 4 -A notchpeak-shared-short -p notchpeak-shared-short -t 2:00:00
module load ollama
export OLPORT=`ruby -e 'require "socket"; puts Addrinfo.tcp("", 0).bind {|s| s.local_address.ip_port }'`
echo $OLPORT
export OLLAMA_HOST=127.0.0.1:$OLPORT
export OLLAMA_BASE_URL="http://localhost:$OLPORT"
ollama serve >& ollama.log
The OLPORT environment variable is a unique port on which the Ollama server will run - this needs to be different every time for the case when another user may be running Ollama on the same compute node at the same time. We print (echo) the OLPORT value so that we can use it in the next step.
Give a few seconds for the Ollama server to start, and verify that it started by viewing the ollama.log, which end should look like:
time=2024-06-10T10:14:58.011-06:00 level=INFO source=routes.go:1074 msg="Listening on 127.0.0.1:43233 (version 0.1.39)"
time=2024-06-10T10:14:58.011-06:00 level=INFO source=payload.go:30 msg="extracting embedded files" dir=/tmp/ollama2373407420/runners
time=2024-06-10T10:14:59.907-06:00 level=INFO source=payload.go:44 msg="Dynamic LLM libraries [rocm_v60002 cpu cpu_avx cpu_avx2 cuda_v11]"
time=2024-06-10T10:14:59.975-06:00 level=INFO source=types.go:71 msg="inference compute" id=GPU-b5df93bc-b3cb-66db-9191-815ff9357626 library=cuda compute=6.1 driver=12.1 name="Quadro P620" total="2.0 GiB" available="1.5 GiB"
Once the server is started, you can run the Ollama client commands, for example
ollama list
NAME          ID           SIZE   MODIFIED
llama2:latest 78e26419b446 3.8 GB 7 days ago
llama3:latest 365c0bd3c000 4.7 GB 7 days ago
llama3:8b     365c0bd3c000 4.7 GB 7 days ago
Alternatively, one can start Open OnDemand Interactive Desktop session instead of
the salloc command, and then open two terminals, running the ollama serve in one and the ollama commands in the other.
Ollama models
Note that by default the Ollama models get pulled to user's home directory at ~/.ollama, which can fill up the home directory 50 GB quota quickly. For that reason, we are
setting the OLLAMA_MODELS environment variable that controls where the models are
located to CHPC maintained repository at /scratch/general/vast/app-repo/ollama. If you want to use your own models, either unset OLLAMA_MODELS to use the default models location in home directory, or set it to a different path,
e.g. in the scratch or group space.
If you think that the CHPC repository should include a different model, contact us at helpdesk@chpc.utah.edu.
User installation
Ollama gets updated frequently and as such it may be better for users to install their own latest version. While the installation instructions recommend to set it up as a service, this requires an administrator, so, to install it, it's better to proceed with manual installation by downloading the Ollama binary:
curl -L https://ollama.com/download/ollama-linux-amd64.tgz -o ollama-linux-amd64.tgz
tar -C ollama -xzf ollama-linux-amd64.tgz
chmod u+x ollama/bin/ollama
Here we install the ollama into the "ollama" subdirectory of the current directory, this can be changed to any location to which you have write access.
Once the binary is available, start an interactive job and then start the ollama service manually in the terminal:
salloc -N 1 -n 4 -A notchpeak-shared-short -p notchpeak-shared-short -t 2:00:00 --gres=gpu:t4:1
export OLPORT=`ruby -e 'require "socket"; puts Addrinfo.tcp("", 0).bind {|s| s.local_address.ip_port }'`
echo $OLPORT
export OLLAMA_HOST=127.0.0.1:$OLPORT
export OLLAMA_BASE_URL="http://localhost:$OLPORT"
./ollama serve >& ollama.log
Once the server has started, call the Ollama server, pull models, run models, etc.
Alternatively, one can start Open OnDemand Interactive Desktop session instead of the salloc command, starting the Ollama server and running the client commands in the terminal of the Interactive Desktop session.
Huggingface Generative AI Models
Huggingface is one of the most used repositories for generative AI models, and also
provides software for their use. CHPC is providing clones of select models in a repository
located at /scratch/general/vast/app-repo/huggingface. There are several subdirectories corresponding to organizations that provide these
models, namely:
- allenai - tulu-2-dpo-7b, tulu-2-dpo-13b
- CohereForAI - c4ai-command-r-plus, c4ai-command-r-v01-4bit
- meta-llama - Llama-2-7b-chat-hf, Llama-2-13b-chat-hf, Llama-2-70b-chat-hf, Meta-Llama-3-8B, Meta-Llama-3-70B, Meta-Llama-3-8B-Instruct
- mistralai - Mistral-7B-Instruct-v0.1, Mistral-7B-Instruct-v0.2, Mistral-7B-v0.1, Mixtral-8x7B-Instruct-v0.1
- tiiuae - falcon-7b and falcon-40b
Users are welcome to use their own software environments to access these models.
For a quick start, we have created a Generative AI software environment packaged as
a Singularity container called genai, with PyTorch (VERSION) and Huggingface (VERSION) libraries, which can be used alongside
the example Jupyter notebook to illustrate how to access and use these models. This environment can be loaded
as a module for running Python codes, or via Open OnDemand Jupyter when running as
a Jupyter notebook.
Generative AI container/module
The above mentioned container is available as module called genai. We plan to periodically update this module with recent versions of the libraries.
Below are listed the versions of libraries in this module:
| Module/version | Build date | Python | PyTorch | HF Transformers | CUDA |
| genai/2024.5 | 06/07/2024 | 3.12.3 | 2.3.0 | 4.41.2 | 11.8 |
Using the genai module with Python
Start an interactive SLURM job with a GPU, load the module, and then run the Python
code that loads and uses the selected language model. The module defines environment
variable LLM_CACHE_PATH, which points to the centralized language model repository at /scratch/general/vast/app-repo/huggingface. User also needs to specify where local cache is located, which needs to be user
writable and is used for storing runtime parameters. Since these parameters are usually
fairly small, we store it in $HOME/llm/cache as defined in the environment variable HUGGINGFACE_HUB_CACHE in the code below.
$ salloc -N 1 -n 4 -A notchpeak-shared-short -p notchpeak-shared-short -t 2:00:00 --gres=gpu:t4:1
$ module load genai
$ cat load_llama2.py
import os
os.environ['HUGGINGFACE_HUB_CACHE'] =  f"{os.environ['HOME']}/llm/cache"
import torch
from transformers import LlamaTokenizer, LlamaForCausalLM, AutoConfig
model_id = f"{os.environ['LLM_CACHE_PATH']}/meta-llama/Llama-2-7b-chat-hf/"
config = AutoConfig.from_pretrained(model_id, trust_remote_code=True, use_auth_token=True)
tokenizer = LlamaTokenizer.from_pretrained(model_id)
model = LlamaForCausalLM.from_pretrained(model_id, torch_dtype=torch.bfloat16, load_in_8bit=True, device_map="auto")
...
$ python load_llama3.py
Note that in this example we are loading the smallest Llama2-7b model, as we have requested the Nvidia T4 GPU on the interactive notchpeak-shared-short partition which has 16 GB GPU RAM. For larger models use GPUs with more memory, listed at the GPUs and Accelerators page.
Using the genai module with Jupyter
Jupyter is best run in the Open OnDemand web interface. Choose the CHPC Generative AI, in the Jupyter Python version pull down. Also choose the appropriate account and partition and in the Advanced options pick a GPU (for a job that should start right away use notchpeak-shared-short account and partition and the T4 GPU. Click the blue Launch button to submit the job and once it starts, the blue Connect to Jupyter button to start Jupyter in a new browser tab.
To use our sample Jupyter notebook, download it to your home directory (e.g. with the wget command or cloning the whole repository). Then open it in the Jupyter browser window, using the genai kernel (not the default Python3 kernel) and run.
Building a container based on the CHPC genai container
The CHPC genai container is based on a Micromamba container. We recommend this approach as compared to doing plain conda or mamba environment installations, as the container is immutable. That is, it can not be modified once it's built, which prevents occasional breaking of the installed environment during conda updates or installation of additional packages.
To build your own container with modified software stack, modify the Singularity.gpu file and use Apptainer to build a new container:
module load apptainer
apptainer build --nv mygenai.sif Singularity.gpu
Note that we are using the --nv flag to initialize the GPU environment during the container build. Omission of this
flag will result in installation of CPU only PyTorch. The container can be run directly
as shown in our documentation, or one can create an Lmod module for it based on our genai module.
Feedback or additions to the module
We welcome feedback from you about the genai container and module. If you have any comments or would like additional libraries to be installed in future versions, please write to us at helpdesk@chpc.utah.edu .
OpenWebUI
OpenWebUI is a self-hosted web frontend to Large Language Models. It is fairly straightforward to set up, although due to how the entry web page of the UI is structured, it does not work with the Open OnDemand. Our hope was to create an OOD web app like Jupyter or RStudio Server, however, at this point users have to start the server themselves in an interactive job session, ideally via the Open OnDemand Interactive Desktop.
We can utilize the OpenWebUI Docker container to run the server. Since OpenWebUI updates quite often, it may be the best to pull your container, or you can use CHPC's container, though this one may not be the latest. Also note that the OpenWebUI container has hard coded the Ollama server port and the webserver port, so, if someone else runs the same thing on the compute node you run, this will not work. In that case, talk to us on how to modify the container to run the Ollama and the OpenWebUI on a different port.
First start an Open OnDemand Interactive Desktop job, preferably with a GPU.
To run your own container, build an Apptainer container from the Dockerhub image (needs to be done only once):
module load apptainer
apptainer build openwebui-ollama.sif docker://ghcr.io/open-webui/open-webui:ollama
Also only once, create a few directories that need to be bind mounted into the container as writeable, and a file with a secret key:
mkdir ~/openwebui
cd ~/openwebui
mkdir ollama open-webui static
echo `head -c 12 /dev/random | base64` > .webui_secret_key
Then start Google Chrome (we have noticed that Firefox does not work well with the
UI) via 'google-chrome &' in the terminal to start Chrome with the browser in the terminal background so we
can keep using the terminal.
Now we can start the Ollama server and the OpenWebUI webserver by running:
apptainer exec --nv -B ollama:/root/.ollama -B open-webui:/app/backend/data -B static:/app/backend/static
path-to/open-webui_ollama.sif /app/backend/start.sh
The path-to is the path to where the container is, to run the CHPC provided container, use, /uufs/chpc.utah.edu/sys/installdir/r8/openwebui/0.3.1/openwebui-ollama.sif .
Once the servers start, open the URL pointed in the startup log, e.g. http://notch308:8080, in the Google Chrome web browser.
The OpenWebUI by default uses Ollama for the LLM backend, which means that by default
it will be pulling the models to ~/.ollama, which can fill up the home directory 50 GB quota quickly. For that reason, set the
OLLAMA_MODELS environment variable that controls where the models are located. One
can either use the CHPC maintained repository at /scratch/general/vast/app-repo/ollama, or if you want to use your own models, set it to a different path, e.g. in the scratch
or group space.
If you think that the CHPC repository should include a different model, contact us at helpdesk@chpc.utah.edu.